Ansible基本部署
Ansible部署
安装部署
安装环境
主控节点
系统:centos7.7 内存:2G
网络类型:NAT模式 硬盘大小:40G
最小化安装
主控端:
IP:192.168.86.129
受控节点
系统:centos7.7 内存:2G
网络类型:NAT模式 硬盘大小:40G
最小化安装
受控端:
IP:192.168.86.128
IP:192.168.86.130
安装(主控节点执行)
rpm包安装:EPEL源
yum install -y epel-release


# 查看版本信息
[root@anis ~]# ansible-doc --version
ansible-doc 2.9.27
  config file = /etc/ansible/ansible.cfg
  configured module search path = [u'/root/.ansible/plugins/modules', u'/usr/share/ansible/plugins/modules']
  ansible python module location = /usr/lib/python2.7/site-packages/ansible
  executable location = /usr/bin/ansible-doc
  python version = 2.7.5 (default, Jun 20 2023, 11:36:40) [GCC 4.8.5 20150623 (Red Hat 4.8.5-44)]
# ansible 安装目录结构
yum安装如下:
    配置文件目录:/etc/ansible/
  执行文件目录:/usr/bin/
  Lib库依赖目录:/usr/lib/pythonX.X/site-packages/ansible/
  Help文档目录:/usr/share/doc/ansible-X.X.X/
  Man文档目录:/usr/share/man/man1/
ansible部署第一种:
修改配置文件(主控节点)
# 修改hosts文件

[root@ansible ~]# cd /etc/ansible/
[root@ansible ansible]# ll
总用量 24
-rw-r--r--. 1 root root 19983 10月 19 11:32 ansible.cfg
-rw-r--r--. 1 root root  1106 10月 19 09:08 hosts
drwxr-xr-x. 2 root root     6 1月  16 2022 roles
[root@ansible ansible]# vim hosts
# 在行末添加
[test]
192.168.86.128
192.168.86.130

[all]
192.168.86.129
192.168.86.128
192.168.86.130
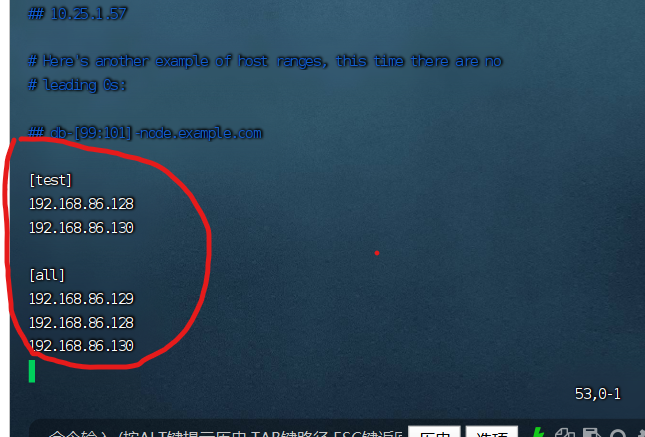
# 删除两个注释

[root@ansible ~]# cd /etc/ansible/
[root@ansible ansible]# vim ansible.cfg


# 去掉第一次连接ssh ask确定
开启记录日志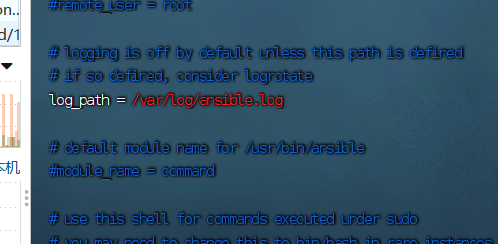
[root@ansible ~]# ssh-keygen
# 一路回车确定

[root@ansible ~]# ssh root@192.168.86.128
The authenticity of host '192.168.86.128 (192.168.86.128)' can't be established.
ECDSA key fingerprint is SHA256:MdtTymY/z3bVlBL5CtBn9J5FcTMxhusCqU/nMj8uTME.
ECDSA key fingerprint is MD5:43:01:fc:03:e8:97:87:cb:86:35:6d:5b:24:35:fe:2b.
Are you sure you want to continue connecting (yes/no)? yes
Warning: Permanently added '192.168.86.128' (ECDSA) to the list of known hosts.
root@192.168.86.128's password:
Last login: Fri Mar 31 15:49:09 2023 from 192.168.86.1

# 此时已经登录到受控节点了,输入exit退出登录

[root@ansible ~]# exit
logout
Connection to 192.168.86.128 closed

# 设置免密登录
# ssh-copy-id root@需要作免密登录的IP地址

[root@ansible ~]# ssh-copy-id root@192.168.86.128
/usr/bin/ssh-copy-id: INFO: Source of key(s) to be installed: "/root/.ssh/id_rsa.pub"
/usr/bin/ssh-copy-id: INFO: attempting to log in with the new key(s), to filter out any that are already installed
/usr/bin/ssh-copy-id: INFO: 1 key(s) remain to be installed -- if you are prompted now it is to install the new keys
root@192.168.86.128's password:

Number of key(s) added: 1

Now try logging into the machine, with:   "ssh 'root@192.168.86.128'"
and check to make sure that only the key(s) you wanted were added.

# 验证免密登陆是否设置成功
[root@ansible ~]# ssh root@192.168.86.128
Last login: Fri Mar 31 16:20:11 2023 from 192.168.86.129

# 可以看到此时已经不需要再输入密码
主机连通性测试


#通过命令
ansible all -m ping


# 绿色字体下
192.168.86.130
192.168.86.128
#代表受控节点,连通性正常
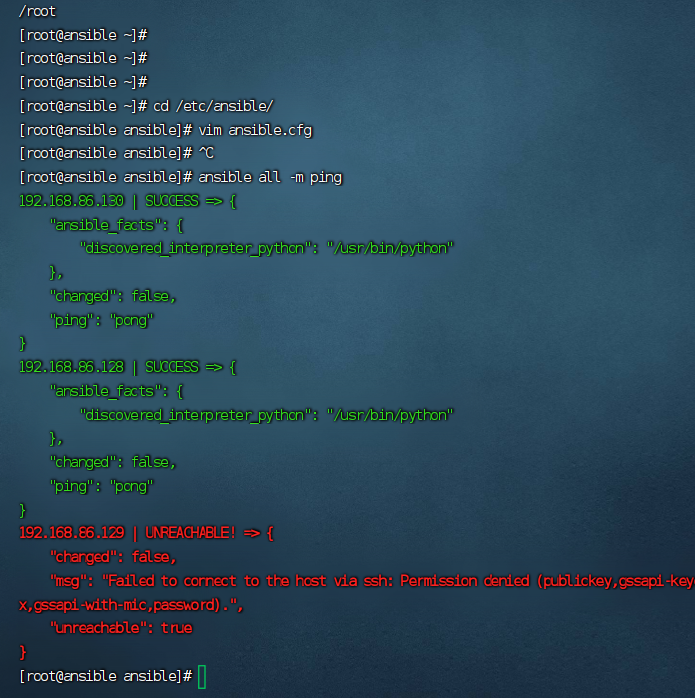
#将主控节点,设置为免密登陆


[root@ansible ansible]# ssh-copy-id root@192.168.86.129
/usr/bin/ssh-copy-id: INFO: Source of key(s) to be installed: "/root/.ssh/id_rsa.pub"
/usr/bin/ssh-copy-id: INFO: attempting to log in with the new key(s), to filter out any that are already installed
/usr/bin/ssh-copy-id: INFO: 1 key(s) remain to be installed -- if you are prompted now it is to install the new keys
root@192.168.86.129's password:

Number of key(s) added: 1

Now try logging into the machine, with:   "ssh 'root@192.168.86.129'"
and check to make sure that only the key(s) you wanted were added.
ansible部署第二种:
[root@ansible ~]# cd /var/opt/
[root@ansible opt]# ls
[root@ansible opt]#
[root@ansible opt]# vim hosts   #新建hosts文件并编辑

编辑hosts文件 写出两个受控节点的配置信息
[test]
192.168.86.128 ansible_ssh_port=22 ansible_ssh_user=root ansible_ssh_pass=123123
192.168.86.130 ansible_ssh_port=22 ansible_ssh_user=root  ansible_ssh_pass=123123

注:定义主机清单
ansible基于ssh连接inventory中指定的远程主机时,将以此处的参数指定的属性进行
    ansible_ssh_port:指定 ssh 端口
    ansible_ssh_user:指定 ssh 用户
    ansible_ssh_pass:指定 ssh 用户登录是认证密码,明文密码不安全
    ansible_sudo_pass:指明 sudo 时候的密码
测试主机连通性
[root@ansible opt]# ansible -i hosts test -m ping -k
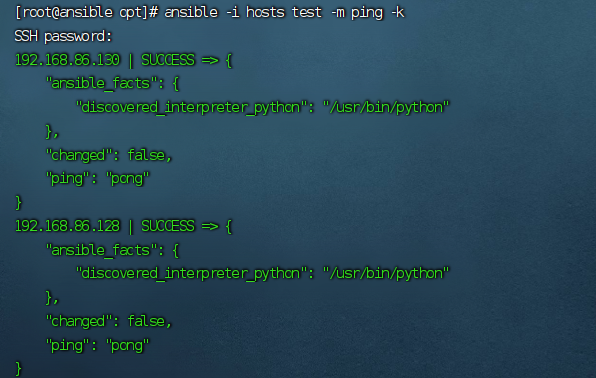
实战1:自动化命令安装httpd服务(第二种部署方法)
#主控节点下

[root@ansible ansible]# ansible -i hosts test -m yum -a "name=httpd state=present"


[root@ansible opt]# ansible -i hosts test -m service -a "name=httpd state=restarted" ##启动httpd服务


#查看模块的帮助的命令
ansible-doc -s yum

# 1.远程命令模块
command:作为ansible的默认模块,可以运行远程权限范围内的所有shell命令;
script:是在远程主机上执行主控端存储的shell脚本,相当于scp+shell组合;
shell:是执行远程主机上的shell脚本
例如:
[root@ansible opt]# ansible -i hosts test -m command -a "free -m"
192.168.86.130 | CHANGED | rc=0 >>
              total        used        free      shared  buff/cache   available
Mem:           1819         902         230          43         685         705
Swap:          2047           2        2045
192.168.86.128 | CHANGED | rc=0 >>
              total        used        free      shared  buff/cache   available
Mem:           1819         894         231          43         693         712
Swap:          2047           2        2045


# 2.copy模块
# copy:实现主控端向目的主机拷贝文件,类似scp功能
# 例如:
#将主控端/opt/hosts的文件拷贝到受控端/tmp中
[root@ansible opt]# ansible -i hosts test -m copy -a "src=./hosts dest=/tmp/ owner=root group=root mode=0755"

#查看/tmp目录中的文件
[root@anis tmp]#  ls /tmp/ -l

# 3.file模块
# 例如:
[root@ansible opt]# ansible -i hosts test -m file -a "path=/tmp/hosts mode=0777"
# 验证:
# 4.stat模块
# stat:获取远程文件信息
# 例如:
[root@ansible opt]# ansible -i hosts test -m stat -a "path=/tmp/hosts"

192.168.86.128 | SUCCESS => {
    "ansible_facts": {
        "discovered_interpreter_python": "/usr/bin/python"
    },
    "changed": false,
    "stat": {
        "atime": 1697851270.449692,
        "attr_flags": "",
        "attributes": [],
        "block_size": 4096,
        "blocks": 8,
        "charset": "us-ascii",
        "checksum": "69e95b3d39cdaf5387a3945254f2c2294d46f1ec",
        "ctime": 1697851941.4003954,
        "dev": 64768,
        "device_type": 0,
        "executable": true,
        "exists": true,
        "gid": 0,
        "gr_name": "root",
        "inode": 34356075,
        "isblk": false,
        "ischr": false,
        "isdir": false,
        "isfifo": false,
        "isgid": false,
        "islnk": false,
        "isreg": true,
        "issock": false,
        "isuid": false,
        "mimetype": "text/plain",
        "mode": "0777",
        "mtime": 1697851270.0966935,
        "nlink": 1,
        "path": "/tmp/hosts",
        "pw_name": "root",
        "readable": true,
        "rgrp": true,
        "roth": true,
        "rusr": true,
        "size": 170,
        "uid": 0,
        "version": "2055148251",
        "wgrp": true,
        "woth": true,
        "writeable": true,
        "wusr": true,
        "xgrp": true,
        "xoth": true,
        "xusr": true
    }
}


# 5.get url模块
# get url:实现远程主机下载指定url到本地,支持sha256文件校验
# 例如:
[root@ansible opt]# ansible -i hosts test -m get_url -a "url=https://mirrors.aliyun.com/epel/epel-release-latest-8.noarch.rpm dest=/tmp/ mode=0440 force=yes"


# 6.yum模块
# yum:linux平台软件包管理
# 例如:安装php服务
[root@ansible opt]# ansible -i hosts test -m yum -a "name=php state=latest"

# 7.cron模块
# crom:远程主机crontab配置
# 例如:[root@ansible opt]# ansible -i hosts test -m cron -a "name='list dir' minute='*/30' job='ls /tmp'"
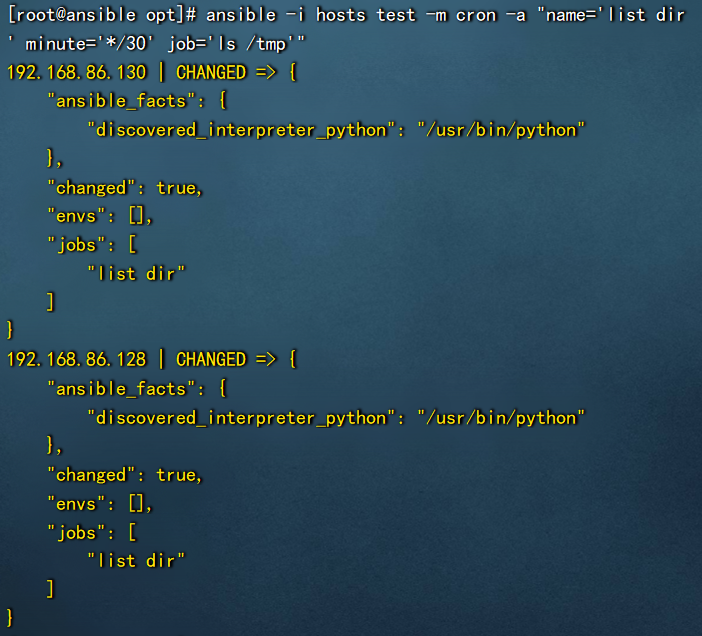
#在受控节点 tomcat-1上查看

[root@tomcat-1 ~]# crontab -l

#Ansible: list dir
*/30 * * * * ls /tmp
# 8.mount模块
# mount:远程主机分区挂载。
# 例如:[root@ansible opt]# ansible -i hosts test -m mount -a "name=/mnt src=/dev/sda1 fstype=ext4 opts=ro state=present"
# 9.service模块
# service:远程主机系统服务管理
# 例如:


[root@ansible opt]# ansible -i hosts test -m service -a "name=httpd state=restarted"
# 10.sysctl模块
# sysctl:远程主机sysctl配置
# 例如:开启路由转发功能
[root@ansible opt]# ansible -i hosts test -m sysctl -a "name=net.ipv4.ip_forward value=1 reload=yes"
# 验证:
# 在受控端中
[root@tomcat-1 tmp]# sysctl -a | grep net.ipv4.ip_forward

# 11.user模块
# user:远程主机用户管理
# 例如:

# 主控端
[root@ansible opt]# ansible -i hosts test -m user -a "name=less state=present"

# 验证
# 受控端
[root@tomcat-1 tmp]# id less
uid=1001(less) gid=1001(less) 组=1001(less)
Playbook
Playbook 是一个不同于使用ansible命令行执行方式的模式,功能更强大灵活,简单地说,playbook是一个非常简单的配置管理和多主机部署系统。
playbooks 中 定义任务:
- name: task description 注释 描述信息
module_name: module_args 声明模块:定义 ansible 模块参数
ansible-playbook 执行 命令:
ansible-playbook <site.yml> ... [options]
playbook 是由一个或多个"play"组成的列表。play的主要功能在于将事先归为一组的主机装扮成事先通过ansible中的task定义好的角色。
# playbook 编写

vim /var/opt/yyds.yml

例如:
---
- hosts: test      #指定主机组
  vars:
    http_port: 80          #定义变量
  remote_user: root       #远程执行的用户
  tasks:                   #执行的那些任务
  - name: ensure apache is at the latest version
    yum: name=httpd state=latest
  - name: write the apache config file
    template: src=/var/opt/httpd.conf dest=/etc/httpd/conf/httpd.conf
    notify:               #当前任务执行完成后要执行的通知操作
    - restart apache
  - name: ensure apache is running (and enable it at boot)
    service: name=httpd state=started enabled=yes
  handlers:               #定义通知操作
    - name: restart apache
      service: name=httpd state=restarted
定义主机清单
ansible基于ssh连接inventory中指定的远程主机时,将以此处的参数指定的属性进行
    ansible_ssh_port:指定 ssh 端口
    ansible_ssh_user:指定 ssh 用户
    ansible_ssh_pass:指定 ssh 用户登录是认证密码,明文密码不安全
    ansible_sudo_pass:指明 sudo 时候的密码
新建文件hosts
[root@xuegod63 opt]# vim hosts
#增加以下内容
[tomcatserver]                 #主机组名
192.168.10.64  ansible_ssh_port=22  ansible_ssh_user=root  ansible_ssh_pass=123456
192.168.10.65                  #主机IP或主机名
简单测试下主机的连通性
[root@xuegod63 opt]# ansible -i hosts tomcatserver -m ping -k
版权申明
本文系作者 @admin 原创发布在安忆笔记站点。未经许可,禁止转载。


暂无评论数据